October 29, 2010

Happy Halloween

Yes, I am a bit nutty when it comes to holidays, and here's your proof. This is just a small area of my living room that has been decorated in what I like to call macabre-chic! Each year I use the same decorations, but I sometimes switch out the way I display something or mix and match until I get the look I want. Almost everything you see was purchased on the cheap and I did not spend more than $5 on any one item. I can't remember where I scored the foam skull head, but I haven't been able to duplicate it since. The skeleton garland was purchased at CVS years ago, and the crows came from a local costume store. I framed an old herb print straight from the internet... I wonder what this motley crew will cook up!

I find that a nice layer of dust gives the whole thing a more authentic feel, so I am feather duster free the week before. (:o) Here is a close-up of the skull, and a trio of books Mr. Crow and a certain baby skeleton have claimed!

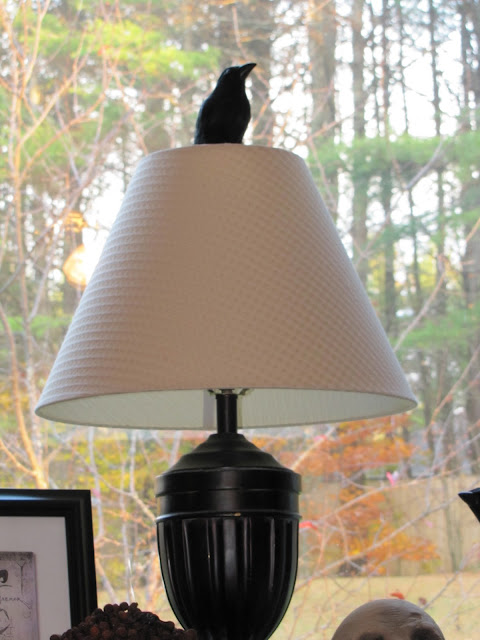
I keep with a theme - crows, skeletons and spiders - and use the same materials in each display. I thought one of the crows made a nice lamp finial, so I stuck him up there so he could keep an eye on things for me. So far so good.

My youngest daughter is having a party this weekend, so I still have to decorate the dining table, but my costumes are just about done. As of today (ahem) my youngest is trick-or-treating as a Greek Goddess and my oldest as a Witch. It should be a good time.

Happy weekend!

October 13, 2010

Halloween Flashback

Halloween to me is pure fun! It's when children and adults get to play dress-up and enjoy being silly. Each year, I get a kick out of haunting my house with cobwebs and spiders, and I love creating costumes for my girls. Just when I think "this is the last one..." they still let me have my fun. And although they are getting older, our whole town gets in on the act so it's still okay for teenagers to dress up and beg for candy!

As I mentioned last year, I was tired of trying to sew together elaborate costumes, so whatever I make is mostly from found items in my basement. The picture above is from last Halloween and it's one of my favorites.

My oldest daughter is a "Corpse Bride" and her costume is really just two drapery panels from Ikea that were left over from a job. She wore a white top and leggings, and then I wrapped one drapery panel around her body and simply pinned it in the back. The other panel is used as a veil and was just placed and bobby-pinned onto her head. No cutting and NO sewing. The only thing I purchased were her flowers at Michael's. Once I got them home, I diluted black watercolor paint and brushed the color on in layers to make them look dead--frozen in time. I secured the bouquet with twine and added some Spanish moss for that just dug up, creepy look.

Daughter #2 is my version of "Mother Nature". She's dressed in a brown sweatshirt and leggings. I found some inexpensive grapevine fencing at Michael's and realized I could use all of my nature-inspired Christmas decorations and a few other goodies I had on hand to complete the look. I wrapped her body in the grapevine and then added sprigs of faux berries, branches, and a few snips from my burning bush for color. Her hat... well her hat became my dining room centerpiece for a while I loved that hat so much! I had two twig bird's nests that I layered on top of one another and the affixed a bird into the center. I then attached (yes, with needle and thread) leaves of various sizes and colors all around the outside of the bottom of the nest and literally stuck in more berries, twigs, and leaves until I was satisfied with the results. I then threaded some twine through the bottom so she could tie it to her head. (Every close-up picture I took came out blurry, so simply enlarge the picture above so you can see the details.)

I'm not a big fan of Halloween make-up you can buy in stores (it's like glue), so I just used what was in my own make-up bag. Daughter #1 got a dusting of baby powder and some red lipstick. A bride should look pretty... regardless if she's supposed to be dead, right. Daughter #2 was covered in India Earth powder so her face blended into the background. (Back in the 80's, India Earth was all the rage, and I still have the same jar.)

I hope you enjoyed my costume ideas, and be sure to check out last year's post for even more. I don't know what's in store for this year just yet, but I'll be sure to let you know.


October 12, 2010

Vintage: Bringing Back Sunday Dinner

Every Sunday, after church, my mother would prepare a big family meal. We gathered around the table mid-afternoon to eat a hearty dinner as we shared stories of our week. This tradition was just one of the many traditions my family celebrated, but it is not one that I embraced when I started my own family. Now that my children are older, I'm trying to get them to slow down long enough to fit in Sunday dinner whenever we can.

This past weekend I made a roast beef dinner that I've prepared so many times, I had to stop and think about how I made it. Here is my recipe...

Roast Beef

1 5-7 lb. top round roast
1 bulb garlic
Olive oil (approx. 2 tbs.)
Rosemary (approx. 2 tbs.)
Thyme (approx. 1 tbs.)
Garlic powder (approx. 1 tbs.)
Onion salt (approx. 1 1/2 tbs.)
Kosher salt (approx. 2 tbs.)

Preheat oven to 350 degrees. Prepare roast by cutting slits into the roast about 1"-2" deep and insert whole garlic cloves. Rub olive oil over the roast to coat and then salt liberally. Coat the roast with rosemary and thyme. Place roast in roasting pan with 1 1/2" of water. Roast approximately 1 1/4 hours, but be sure to check the water level every 40 min. or so and add more. Once the roast is done, let it rest and bring the drippings to a boil. Once reduced slightly, add garlic powder and onion salt to taste and thicken Au jus with a roux (equal parts fat and flour) if desired. (Cooking times may vary. I use the roast setting on my convection oven.)

Need more inspiration? Check out Sunday Suppers where you will find the roasted lamb recipe (pictured above) and all sorts of menu ideas. It's a feast for all your senses!

Enjoy!

October 5, 2010

Color: Orange vs. Red

How about a little of both? As you may know, red is my favorite color (followed closely by green), but I LOVE orange. So much so, that's it's starting to nudge out the competition. So when you pair the two together... you create a highly energized, happy-to-be-alive kinda space!

All I have to do is look outside my window to see my favorite colors come to life. I'm so lucky to live in New England this time of year.


Color Inspiration:
Gypsy Red SW 6865, BM Chili Pepper 2004-20, BM Corlsbud Canyon 076
BM Audubon Russet HC-51, Habanero Chili SW 7589

Images via elledecor.com